顯示具有 Bread | 麵包 標籤的文章。 顯示所有文章

1/16/2015

蜂蜜燕麥吐司 Honey-Oat Pain de Mie


蜂蜜燕麥吐司,來自麵粉品牌 King Arthur網站的食譜,採用 poolish的方式製作,省去黏手的階段,也讓燕麥與麵粉有充分的時間吸收水分。

傍晚開始製作,到睡前將麵團整形入模,蓋上保鮮膜送入冰箱冷藏過夜,第二天早上取出放在室溫下回溫 1.5小時,再送入烤箱烘烤,富有蜂蜜香甜氣味的燕麥吐司就輕鬆出爐了。

因為想要這種膨潤的外型,就沒有採用台日式吐司的二次桿捲法,再加上燕麥的成分,吐司內身看起來就沒有非常細緻,但可以肯定的是口感仍然很柔軟呢!

Pin It

1/13/2015

葡萄乾核桃優格麵包 Walnut Raisin Yogurt Bread


自從感恩節入手優格機之後,家裡就有新鮮自製優格可以吃,不管是把多的乳清濾出變成濃濃的希臘優格、還是不過濾直接吃滑嫩濕潤的一般優格,搭配上新鮮水果的滋味實在是太棒了!完全不會想要再吃市面上加了果泥果醬的調味優格啊!

前幾天做了第四桶優格,每一次做都是用前一次預留下來的一部分當作菌種,這次做到第四桶發現菌種可能活性降低了,整桶優格雖然味道是對的,但是質地明顯更為濕潤、凝結的效果也減弱,這表示該更新菌種囉~

雖然這桶一樣可以吃,就拿一部分來做麵包看看吧!


Pin It

12/26/2014

糯米麻糬吐司 Sticky Rice Mochi Sandwich Loaf


冬至,一年中白天最短的一天,習俗上在這天要吃湯圓,兩歲多的兒子自從夏天在花蓮吃過麻糬之後就很喜歡那種 QQ的口感,冬至家裡煮包餡甜湯圓,切小塊給他自己舀著吃,他也是非常喜歡呢!要是午睡前跟他預告睡起來點心是「麻糬做的湯圓」,他會在爸媽輕聲叫他起床那一瞬間彈起來、一邊說「馬吉、馬吉!」

家裡有一些糯米粉,來試試看添加在白吐司配方中會有什麼效果吧!

Pin It

12/20/2014

夏威夷麵包免揉版 No-Knead Hawaiian Rolls


提高麵團含水量,製作出口感更軟的麵包;不想揉濕黏的麵團,那就用免揉的做法拉長時間來製作。這個配方同時調整份量,將之前可做出 15顆大餐包的份量改為 12顆小餐包。


Pin It

11/14/2014

夏威夷麵包及吐司(仿作食譜) Hawaiian Rolls & Loaf (copycat)


原來把配方中的一半液體用果汁取代,就能帶來這麼棒的味道!

初次認識這款麵包,是先在網路上看到好多仿作食譜,就好奇那是什麼麵包這麼受歡迎,但也一直沒有去找來吃過。直到今年春天一次朋友邀約去露營,朋友帶了一大包 King's Hawaiian Rolls,才真正吃到這款柔軟香甜的小麵包。


Pin It

11/07/2014

布里歐吐司 Brioche Loaf


布里歐 Brioche是一款高奶油含量的法式麵包,奶油的含量差不多能和可頌比擬了,但不像可頌是麵團和奶油層層堆疊、做法耗時繁複,布里歐的奶油是融入麵團,烤出細緻鬆軟的奶蛋吐司。

一款稱不上健康,走的是真材實料、豐富感受路線的麵包,有時候就是想要來這麼一條味道濃郁的香軟吐司。單吃就很好吃,放了兩三天之後也非常適合製作法式吐司、麵包布丁等等。


Pin It

4/28/2014

英式瑪芬麵包 English Muffins (Frances Quinn's Recipe)


我非常愛英式瑪芬麵包,之前試過兩種配方,初步明白了那些美味口感的來源--坑坑洞洞的秘密在於含水量超高近乎 100%的糊狀麵團。這場自製英式瑪芬的摸索之旅還會繼續,我心裡已有個不同想法,下回可以嘗試。

English muffins have been one of my favorite breads. I had tried 2 different recipes before and understood that the secret of nooks and crannies lies in a almost 100%-hydration batter-like dough. This journey will be continued as I already have a new idea to try next time.


Pin It

4/21/2014

伯爵奶茶吐司 Earl Grey Milk Tea Bread


鍋煮奶茶放涼後拿來做麵包,烘烤時滿屋子的奶茶香,光用聞的就好像享用了一頓悠閒的下午茶。

Infuse tea leaves in scalded milk, let it cool and make into bread dough. My house smelt like an afternoon tea when the bread was baking.


Pin It

3/18/2014

英式瑪芬麵包 English Muffins (Alton Brown's Recipe)


不同食譜比較 Comparison: 


這就是喜歡英式瑪芬的人們在說的「坑坑洞洞」,那些融化奶油會流進去的小洞啊!迷人之處就在這裡。

我覺得這個麵團並不是一般想像中的「麵團」,說是「麵糊」還比較恰當。稍微算一下就會發現它的含水量超過 100%。烘焙時其中重要的一環就是比例了吧!不同的麵粉液體比例,就創造出數不清的烘焙品種類,更不用說再加上油脂、糖分、穀物、堅果、種子、香料、蛋、甚至蔬菜水果等其他材料了。這也是烘焙讓我著迷之處,千變萬化呀!

處理這麼個麵糊狀的麵團,金屬圓圈模是必須的。我之前試做過一次,試圖用紙和鋁箔紙自製圈圈模,但太軟了,沒辦法用在這份食譜;所以我就訂了些模具,之後也可以拿來做漢堡麵包、比斯吉等等。如果家裡沒有模具,也不想花錢買,網路上很多人建議可以用兩邊都挖空的鮪魚罐頭、自製罐頭用的那種寬口金屬圈。

說了這麼多,這吃起來如何?最重要的「坑坑洞洞」是出現了沒錯,但我覺得酵母味太重、奶味也太重。下次要繼續嘗試另一份食譜,用比較少的酵母,以及單純用水,而不是牛奶。


This is what people are talking about, almost. "Nooks and crannies," those little holes that are supposed to pool melted butter. Yum!

The dough is not really a dough as you think, I'll say. It's more batter than bread dough. If you do the math you'll find it over 100% hydration. It's always about the ratio. With different ratios of flour to liquid, numerous types of baking goods are created. Not to mention other ingredients like fat, sweeteners, grains, nuts, seeds, herbs, eggs, and even fruits and vegetables. I found that the most enjoyable part of baking, endless possibilities.

So with a batter kind of dough, metal rings are suggested. I tempted to do it with DIY rings made from paper and foil, but that was too soft for this recipe. So I got myself some real metal rings, thinking about versatile uses like making hamburger buns and large biscuit. If you don't have rings and don't want to get some, tuna cans (with both ends removed) and wide-mouth canning rings are also suggested as you can see on the internet.

Oh and the results? Yes, there are the most wanted nooks and crannies. But I found it somehow too yeasty and also too "rich." Next time I'll try another recipe using less yeast and simply water rather than milk.
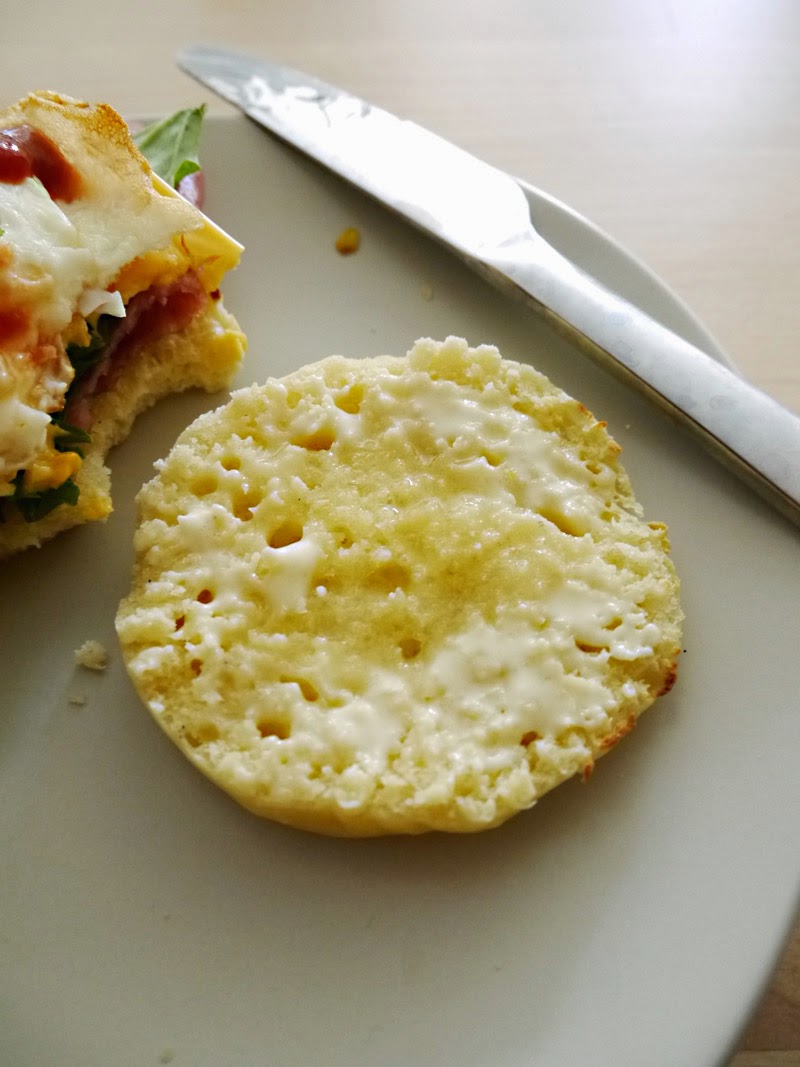

塗上奶油 | With butter!


英式瑪芬麵包(8-10個)

材料:
  • 熱牛奶 1 杯
  • 鹽 1/2 小匙
  • 糖 1 大匙
  • 無鹽奶油 1 大匙
  • 乾酵母 2 1/4 小匙(1小包)
  • 糖 1/8 小匙
  • 溫牛奶 1/3 杯
  • 中筋麵粉 2 杯
  • 鹽 1/2 小匙
  • 液態植物油 適量,塗模具用
  • 直徑 3 1/2吋金屬圓圈模 數個


做法:
  1. 將熱牛奶、鹽 1/2 小匙、糖 1 大匙、奶油混合,攪拌均勻讓鹽和糖溶解。放涼。
  2. 乾酵母和糖 1/8 小匙加入溫牛奶攪勻。
  3. 步驟 1放涼後加入步驟 2,加入麵粉拌勻成麵糊。
  4. 加蓋靜置室溫 45-60分鐘。加入剩餘的 1/2 小匙鹽,拌勻。
  5. 平底鍋加熱,圓圈模塗上薄薄一層油脂,放入鍋中。
  6. 用 1/4 杯的量杯,舀滿滿 1/4 杯的麵糊到每個模具中。鍋蓋蓋上,中火到中小火加熱 8分鐘。用夾子翻面,蓋上鍋蓋再煎 8分鐘。 
  7. 煎好的瑪芬移到架上、將模具移除,瑪芬放涼。繼續煎剩下的麵糊。
  8. 用叉子將瑪芬分開,不要用麵包刀,才能保留那些最美味的坑洞!


English Muffins (8-10 muffins)

Ingredients:
  • milk 1 cup, hot
  • salt 1/2 teaspoon
  • sugar 1 Tablespoon
  • butter 1 Tablespoon
  • active dry yeast 2 1/4 teaspoons (1 envelope)
  • sugar 1/8 teaspoon
  • milk 1/3 cup, warm
  • all-purpose flour 2 cups
  • salt 1/2 teaspoon
  • vegetable oil for greasing rings
  • 3 1/2-inch metal rings


Directions:
  1. Mix hot milk 1 cup, salt 1/2 teaspoon, sugar 1 Tablespoon, and butter. Stir until salt and sugar are dissolved. Set aside to cool.
  2. Dissolve yeast and sugar 1/8 teaspoon in warm milk.
  3. Make sure the butter-milk mixture is cool enough and add it to the yeast-milk. Add flour and stir to form a batter-like dough.
  4. Cover and let it rise for 45-60 minutes. After rising, add the remaining 1/2 teaspoon of salt and mix well.
  5. Heat a pan on medium. Lightly grease the metal rings and put them in the pan.
  6. Use a 1/4 cup to scoop generously 1/4 cup of batter into each ring. Cover and cook on medium to medium-low for 8 minutes. Flip using tongs, cover keep cooking for anther 8 minutes.
  7. Place muffins on a rack, remove the rings and let cool. Repeat with remaining batter.
  8. Split with fork so you can keep those "nooks and crannies!"


塗了奶油再加蜂蜜也很美味 | Butter and honey? Nom nom...


Pin It

3/17/2014

英式瑪芬麵包 English Muffins (Peter Reinhart's Recipe)


不同食譜比較 Comparison: 


這個食譜的結果我不喜歡,做出來的英式瑪芬麵包(滿福堡)就像一般的麵包口感。我覺得英式瑪芬就是應該要有粗粗脆脆的外皮、QQ的內身呀!那些美妙的「坑坑洞洞」都到哪兒去了?

正在持續試做其他食譜,期待有好結果。

Well, I'm not satisfied with this recipe. It makes bread-like english muffins. But in my opinion, english muffins should have crisp crust and chewy crumb. All those "nooks and crannies," where are they?

I'm experimenting with other recipes and will post when I have good results.


手邊沒有玉米碎粒,用麥麩也是可以啦 | I didn't have cornmeal, so used wheat bran instead.


英式瑪芬麵包(6-8個)
修改自 Peter Reinhart在 The Bread Baker's Apprentice當中的食譜

材料:
  • 高筋麵粉 2 1/4杯
  • 糖 1/2大匙
  • 鹽 3/4小匙
  • 乾酵母 1 7/8小匙
  • 無鹽奶油 1大匙
  • 牛奶 210ml + 醋 30ml
  • 玉米碎粒


做法概要:
  1. 麵團揉好之後第一次發酵 90分鐘,然後分成 6-8塊。
  2. 滾圓後稍微壓扁,兩面粘上玉米碎粒,放烤盤上二次發酵 90分鐘。
  3. 烤箱預熱 350F/175C。在爐子上以平底鍋中火兩面各乾煎 5-8分鐘,送入烤箱再烤 5-8分鐘。


English Muffins (makes 6-8 muffins)
Adapted from Peter Reinhart's recipe in The Bread Baker's Apprentice

Ingredients:
  • bread flour 2 1/4 cups
  • sugar 1/2 Tablespoon
  • salt 3/4 teaspoon
  • active dry yeast 1 7/8 teaspoons
  • butter 1 Tablespoon
  • milk 7 ounces + vinegar 1 ounce
  • cornmeal for dusting


Summarized Directions:
  1. After kneading and a 90-minute rise, divide the dough into 6-8.
  2. Shape into rolls and press a little. Roll with cornmeal on both sides and let the doughs rest on baking sheet for 90 minutes.
  3. Preheat oven at 350F/175C. Cook the dough in a pan on stovetop for 5-8 minutes each side. Bake immediately in the oven for another 5-8 minutes.


Pin It

3/04/2014

起司吐司 Braided Cheese Bread


This is a beautiful loaf, my first braided bread. But it tastes not good enough. I kept imagining that there will be a savory taste - salty and garlicky, but there isn't. Next time I should add some minced garlic, salt and pepper, or herbs. And I should use butter instead of vegetable oil to enhance the flavor. 

Well, let's just pretend it is a simple and plain sandwich loaf, with a hint of cheese.

這條吐司很美,是我第一次做辮子造型的麵包。但是味道方面還差強人意。我一直覺得這條吐司應該要有鹹香的味道,像是蒜味之類的,但是沒有(因為沒放蒜末啊!)下回我要加一些蒜末、撒些鹽和胡椒、或是加入一些香料。而且這次用的是植物油,改用奶油應該也會比較香。

那這次就當做是做了條,帶有點起司味的白土司吧。


Braided Cheese Bread (9" loaf.)

Ingredients:
  • Old dough (pâte fermentée) 100-120 g, tear or cut into small pieces.
  • wheat germ 40 g
  • bread flour 255 g
  • active dry yeast 5 g
  • salt 4 g
  • sugar 20 g
  • water 183 g
  • vegetable oil 20 g (should have used butter)
  • grated cheese of your choice

Directions:
  1. Mix old dough, wheat germ, bread flour, yeast, salt, and sugar together. Add water, and mix or knead to form a dough.
  2. When the dough is formed, knead it for 2-3 minutes until a little elastic. Add the oil/butter.
  3. Knead until the dough is very smooth and elastic, almost the windowpane stage.
  4. Cover and let it rise for 2 hours at room temperature.
  5. Scrap the dough out and punch down. Roll it out to a flat rectangle. Spread the cheese all over it. Roll up.
  6. Cut the roll-up dough into 2, lengthwise. Pinch one end together. Gently braid the loaf by placing one half onto another repeatedly.
  7. Place the braided loaf in a 9" loaf pan. Cover with damp cloth and let it rise for 1 hour or until just as high as the pan.
  8. Preheat the oven to 350F. Bake for 32 minutes.
  9. Let it cool completely before slicing.


起司吐司(12兩)

材料:
  • 老麵 100-120 克,分成小塊
  • 小麥胚芽 40 克
  • 高筋麵粉 255 克
  • 乾酵母 5 克
  • 鹽 4 克
  • 糖 20 克
  • 水 183 克
  • 液態植物油 20 克(應該要用奶油)
  • 喜歡的起司,刨絲

做法:
  1. 將老麵、小麥胚芽、高筋麵粉、酵母、鹽、糖混合,加入水,攪拌均勻成團。
  2. 麵團成團之後,手揉 2-3分鐘,然後加入油/奶油。
  3. 繼續搓揉直到麵團光滑有彈性,快要可以撐出薄膜。
  4. 加蓋,室溫發酵 2小時。
  5. 將麵團刮出,輕壓排氣。桿開成大大一片長方形,鋪上起司、輕輕捲起。
  6. 將麵團卷縱向切開成 2長條,將一頭稍微捏合,然後 2長條輕輕扭轉成麻花辮。
  7. 麵團放入吐司模,以濕布或保鮮膜覆蓋,室溫發酵 1小時或直到和烤模同高。
  8. 烤箱預熱 350F/176C,烘烤 32分鐘。
  9. 涼透了再切片。


Pin It

3/02/2014

貝果 Bagels


Sesame, cheese, and a plain one. Small ones are for my toddler.
芝麻、起司、還有一個原味。小貝果是兒子的。


It's been 2 years since last time I made bagels. My husband loves it but we didn't buy any in the past 6 months at least. (Well, he had one at Noah's Bagels last month.) My results are not as pretty as I imagined nor as those on Pinterest. Doesn't matter, they're tasty. They're made from a lean dough but our house smelled great after baking them. And I'll keep making them whenever we want bagels.

Bagels are perfect for trying different flavors of cream cheese spread, aren't they?

距離上一次做貝果已經兩年了。老公還滿喜歡吃貝果,但我們在過去的至少六個月間竟然都沒有買過,(只有上個月老公在貝果名店 Noah's Bagels有吃一個。)這次的結果不如我想像中的那麼美,也比不上 Pinterest上的那些;但有什麼關係呢?好吃就好了!這些貝果的麵團很低脂低糖,但烤出爐之後家裡好香。只要想吃,我就還會再繼續做。

貝果真是很適合用來搭配各種不同口味的起司抹醬啊~


Bagels (6 large)
(Based on: The Bread Baker's Apprentice by Peter Reinhart.)

Ingredients:
Sponge
  • active dry yeast 3 g
  • bread flour 240 g (Here I used whole wheat 120 g + bread flour 120 g.)
  • water 297 g

Main dough
  • active dry yeast 1 g
  • bread flour 225 g
  • salt 8 g
  • brown sugar 7 g

For boiling
  • baking soda 7 g

For finishing
  • any seeds or cheese to top the bagels


Directions:
  1. Mix all the sponge ingredients together, cover and let it rise at room temperature for 2 hours.
  2. Add all the main dough ingredients to the sponge, and mix to form a dough.
  3. Turn the dough out, knead for 10 minutes.
  4. Immediately divide the dough into 6 pieces or as you like. Roll each dough into rolls, cover with plastic wrap or damp towel, let the rolls rest for 20 minutes.
  5. Dust a roll with some flour, poke a hole in the middle of it and rotate around to form a bagel with a 2 1/2 inches hole. Repeat with the remaining rolls. Cover and let the bagels rest for 20 minutes.
  6. While the bagels are resting, preheat the oven to 500F/260C, and bring a pot of water to a boil, add the baking soda.
  7. Gently drop the bagel into boiling water, boil for 1 minute per side. Repeat until all the bagels have been boiled. Top the bagels once they come out of the water and be put on a lined baking sheet.
  8. Bake for 5 minutes. Rotate the baking sheet, lower the temperature to 450F/230C, and bake for another 5 minutes or until browned as prefer.
  9. Cool on a rack before slicing and serving.


貝果(6大顆)
(參考自:The Bread Baker's Apprentice by Peter Reinhart.)

材料:
中種
  • 乾酵母 3 克
  • 高筋麵粉 240 克(我用了全麥麵粉 120克 + 高筋麵粉 120 克)
  • 水 297 克(室溫就可以)

主麵團
  • 乾酵母 1 克
  • 高筋麵粉 225 克
  • 鹽 8 克
  • 黑糖 7 克

煮麵團用
  • 小蘇打粉 7 克

不同口味配料
  • 任何喜歡的種子堅果類、起司


做法:


  1. 將中種所有材料混合均勻,加蓋後室溫靜置 2小時發酵。
  2. 將主麵團所有材料加入中種(注意鹽和酵母不要直接整搓接觸,會影響酵母活性),混合均勻成麵團。
  3. 將麵團取出到桌面,手揉 10分鐘。
  4. 立即將麵團分割成 6塊或是喜歡的數量,整形成球形之後用保鮮膜或濕布覆蓋,讓麵團休息 20分鐘。
  5. 取一球麵團表面撒些麵粉,用手指往中間戳一個洞,然後雙手一邊繞圈一邊將洞擴大,整形成貝果的形狀,中間的洞要稍大一點才不容易閉合,約 2.5吋。完成所有貝果的整形,用保鮮膜或濕布覆蓋,讓貝果休息 20分鐘。
  6. 烤箱預熱 500F/260C,取一鍋水煮滾,加入小蘇打粉。
  7. 輕輕將貝果放入滾水,兩面各煮 1分鐘後撈起。重複此步驟直到所有貝果都煮過。如果喜歡放配料,在貝果從水中撈起後立即撒上或沾上,放到鋪了烘焙紙的烤盤上。
  8. 送入烤箱烤 5分鐘,將烤盤 180度轉向,溫度調降到 450F/230C,再烤 5分鐘或直到想要的上色程度。
  9. 放在架上涼了再切或享用。


Pin It

2/27/2014

40%全麥吐司(有金邊!)40% Whole Wheat Sandwich Bread (with Golden Rim!)


Oh ya my loaf came out with a golden rim (the pale edge at the corner compared to the top!) Close the lid and send it into the oven when the dough reaches 1 inch below the pan. Bake at 350F for 45 minutes with the lid on all the time.


金邊出現了!麵團發到距離烤模邊緣一吋時蓋上蓋子、送進烤箱,350F/175C帶蓋烤 45分鐘。


Pin It

2/24/2014

楓糖葵花籽麵包 Maple Sunflower Seeds Bread


Maple Sunflower Seeds Bread

Ingredients:
Poolish
  • whole wheat flour 75 g
  • bread flour 70 g
  • milk 163 g
  • active dry yeast 3 g

Main dough
  • poolish
  • bread flour 105 g
  • salt 4 g
  • maple syrup 20 g
  • butter 10 g
  • sunflower seeds 50 g, toasted at 350F/176C for 7-8 minutes.


Directions:
  1. Mix all the poolish ingredients well and let it rise at room temperature for 1 hours. Put it into the fridge overnight.
  2. Let the poolish sit at room temperature for 1 hour. Add all the other ingredients but butter and sunflower seeds.
  3. Knead the dough. Gradually add the butter. Knead until smooth, about 8-10 minutes.
  4. Knead in most of the sunflower seeds.
  5. Cover and let it rise at room temperature for 1 1/2 hours.
  6. Scrape the dough out, punch down. Shape. Let it rise on a prepared baking sheet for 45 minutes, covered with damp cloth.
  7. Preheat the oven to 400F/200C. Spray or brush the dough with some water and sprinkle the remaining sunflower seeds. Bake at 400F for 23 minutes.


楓糖葵花籽麵包

材料:
中種
  • 全麥麵粉 75 克
  • 高筋麵粉 70 克
  • 牛奶 163 克
  • 乾酵母 3 克

主麵團
  • 中種
  • 高筋麵粉 105 克
  • 鹽 4 克
  • 楓糖漿 20 克
  • 奶油 10 克
  • 葵花籽 50 克,以 350F/176C烘烤 7-8分鐘


做法:
  1. 將所有中種材料混合均勻,室溫下靜置 1小時,然後放入冰箱冷藏過夜。
  2. 將中種由冰箱中取出,室溫下回溫 1小時。加入麵粉、鹽、楓糖漿。
  3. 翻揉麵團,慢慢加入奶油揉勻,繼續揉到麵團光滑,大約 8-10分鐘。
  4. 揉入大部份的葵花籽。
  5. 加蓋,室溫發酵 1.5小時。
  6. 將麵團取出、輕壓排氣,整形。放在烤盤上以濕布覆蓋,二次發酵 45分鐘。
  7. 烤箱預熱 400F/200C。麵團表面噴或輕輕塗些水,撒上剩餘的葵花籽。烘烤 23分鐘。


Pin It

2/18/2014

40%全麥吐司 40% Whole Wheat Sandwich Bread


Soaking the whole wheat flour overnight gives the flour plenty of time to be hydrated, also brings out its full flavor. The shaping technique (rolling out and up) gives the bread its delicate texture. (For more detailed pictures, check here.) It's more like a Japanese sandwich bread, a shokupan. And honey, honey eliminates the slightly bitter taste usually appearing in whole wheat bread. Along with butter they make this whole wheat bread so delicious.

The ultimate pullman loaf should not have sharp corners, but round ones. And the perfect if there's a "golden rim" (the round edge which is paler than the top of the loaf.) I got the round edges this time but not golden rim.

將全麥麵粉浸泡一晚讓麵粉有足夠的時間吸飽水份,同時也帶出了全麥的香氣。桿捲的整形方式讓吐司麵包組織細密,不同於美式吐司。(桿捲的照片看這裡。)而蜂蜜消除了全麥麵包中常見的微苦味,再加上奶油,讓這條全麥吐司變得美味。

理想的帶蓋吐司不該是尖尖的直角(出角),微圓的邊角比較好;最完美的還要有金邊(頂邊一圈顏色比較淺。)這次我烤出了微圓角,但還沒有金邊。

The crumb is more even this time, but it is still slightly denser near the crust. Should be more aware of the proofing.
這次組織有比較均勻細密,但靠近邊緣處還是有點較緊密。要再更注意進爐前的發酵。


40% Whole Wheat Sandwich Bread (makes a 9x4 pullman loaf)

Ingredients:
  • Old dough  (pâte fermentée) 95-100 g, tear or cut into small pieces.
  • whole wheat flour 140 g
  • water 183 g
  • bread flour 152 g
  • active dry yeast 5 g
  • salt 4 g
  • honey 25 g
  • butter 20 g, softened


Directions:
  1. The day before baking: put the old dough into the fridge to thaw if it's frozen. Mix whole wheat flour with water and let it soak overnight in the fridge.
  2. Mix bread flour, yeast, salt together. Pour whole wheat flour mixture in, add honey, and mix or knead to form a dough.
  3. When the dough is formed, knead it for 2-3 minutes until a little elastic. Add the butter.
  4. Knead until the dough is very smooth and elastic, almost the windowpane stage.
  5. Cover and let it rise for 1 1/2 hours at room temperature.
  6. Scrap the dough out and degas. Divide into 3 pieces. Shape into balls. Cover with damp cloth and let them rest for 15 minutes.
  7. Roll each dough out on a floured surface. Flip and gently roll up (ideally 1 1/2 to 2 times.) Cover with damp cloth and let them rest for 15 minutes.
  8. Roll each dough out again, flip and gently roll up to form short and fat dough rolls (ideally 2 1/2 to 3 times.) Place them in a 9" loaf pan. Cover with damp cloth and let it rise for 1 hour or until just 1" below the rim. Close the lid (if using pullman pan.)
  9. Preheat the oven to 350F. Bake for 25 minutes. Remove the lid and bake for 20 more minutes. (Or total 30-35 minutes at 350F in an open pan.)
  10. Let it cool completely before slicing.


40%全麥吐司(12兩 帶蓋吐司)

材料:
  • 老麵 95-100 g, 分成小塊
  • 全麥麵粉 140 克
  • 水 183 克
  • 高筋麵粉 152 克
  • 乾酵母 5 克
  • 鹽 4 克
  • 蜂蜜 25 克
  • 奶油 20 克,室溫軟化


做法:
  1. 前一天:將老麵從冷凍移到冷藏退冰。全麥麵粉與水混合均勻,放冷藏浸泡一晚。
  2. 高筋麵粉、酵母、鹽混合,倒入全麥麵糊、蜂蜜,攪拌成團。
  3. 翻揉麵團 2-3分鐘,稍有彈性之後加入奶油。
  4. 將麵團移出到桌面,反覆揉到光滑有彈性,幾乎可以撐出薄膜。
  5. 加蓋於室溫下發酵 1.5小時。
  6. 將麵團刮出、輕壓排氣,分成三份滾圓,以濕布覆蓋休息 15分鐘。
  7. 桌面撒些麵粉,將麵團桿開、翻面後輕輕捲起(最理想是 1.5-2圈。)以濕布覆蓋休息 15分鐘。
  8. 將麵團卷從短邊再次桿開,翻面後輕輕捲起,形成短短胖胖的麵卷(最理想是 2.5-3圈。)。將三團麵卷放入吐司模,以濕布覆蓋,室溫發酵 1小時或是直到八九分滿,蓋上土司模蓋。
  9. 烤箱預熱 350F/176C,將麵團放入烘烤 25分鐘,蓋子拿掉再烤 20分鐘。(不帶蓋吐司:烤溫一樣,共烘烤 30-35分鐘。)
  10. 脫模後完全涼透了再切片。

I baked this loaf the day before, sliced it and took photos later. So the crust is a bit wrinkled.
吐司是前一天烤好,隔天早上才切片拍照的,因此吐司皮有點皺。

Pin It
Related Posts Plugin for WordPress, Blogger...