Since I received my pullman pan, I had been trying to bake a nice loaf.
The first time I failed. The bread has a thick, tough crust, and also a sunken top. I did some searching before making it and found most pullman recipe bake at 400F. A baking blog I often visit suggests 40 mins at 410F. I baked this first loaf at 400F for 30mins and it has a thick crust. I asked questions in Bread Baking group and bakers say it looks like under knead and over risen.
自從收到我的帶蓋吐司模以來,我一直都在試著要烤出漂亮的吐司。
第一次失敗了,麵包皮很厚很硬,而且頂面凹陷。開始動手之前我搜尋了一下,大部份的帶蓋吐司食譜用 400F/205C烘烤,而我常常看的烘焙部落格 Carol自在生活建議 410F/210C烤 40分鐘。我用 400F烤 30分鐘,結果就是又厚又硬的皮。我在麵包烘焙社團發問,前輩們說麵包看起來是揉得不夠、發得太過。
 |
| The first loaf. Failed. |
This crust problem was solved when I tried it the second time. I found recipes on USA Pans website and it says 350F, 25 mins with lid plus 20 mins without lid. The crust came out thin and softer than first loaf. But yet a sunken top.
But I found the reason myself when I opened the lid a little and peeked right before sending it into the oven, after the 2nd rise was complete... I thought I heard a hiss...
Peeking makes the dough deflate and results in a collapsed top.
厚皮的問題在第二次嘗試時解決了。我在這個吐司模的廠商網站上找到食譜,用 350F烤 25分鐘,然後蓋子拿掉再烤 20分鐘。麵包皮的部分烤出來薄多了,也比較軟。但是,仍然有頂面凹陷的問題。
不過這回我自己找到原因了,就在二次發酵完成,要把麵包送進烤箱之前我把蓋子打開一些偷看了一下,我似乎聽到了一陣嘶聲...
偷看的動作讓麵團消氣,導致烤出來的麵包頂部凹陷。
 |
| The second loaf. Failed. |
Third time's the charm! The third time I used freshly bought yeast and did more kneading (I did the windowpane test and the poke test!) (Click for more info about testing dough.) The proofing went so quickly and so big! My dough reached the lid of the container and I seldom had a first rising like this! And in just 25 mins in a warm oven the 2nd rise grew higher than my pan so I couldn't cover it. I punched it down, shaped it again. Lower the proofing temperature and watched it closely as it was rising. Closed the lid when almost full (about 45 mins.) I waited for 10 more mins before started to preheat (just want a perfectly square shape bread so badly.) When the bread was baked, it overflowed the pan, left a funny look.
It tastes nice though. And by just trimming off the excess crust, I had a satisfying loaf!
事不過三!第三次製作我用的新買的酵母,也多花了些時間揉麵團,還做了揉麵是否完成的一些測試(戳了會快速恢復原狀、可以撐出薄膜)(參考網頁在這)。麵團發酵得又快又大,都碰到我的大保鮮盒蓋子了,這種結果在我的麵團不常見哪!而且二次發酵時,在微溫的烤箱裡僅僅 25分鐘,麵團就長大到比吐司模還高,根本沒辦法蓋蓋子,我只好把麵團刮出來排氣重新整形,重新再做一次發酵,這回降低發酵的溫度,緊緊看著到快滿模時就蓋上蓋子(約45分鐘),等十分鐘後開始預熱烤箱(實在太想要方正的吐司,所以貪心的希望它滿模,滿到不行)。麵包烤好之後,麵團無處可去就從烤模的縫隙擠了出來,看起來還挺好笑的。
不過只要把這些多餘的麵包皮切掉,吐司本身還挺好吃喔!
 |
| The third loaf! |
Pullman Loaf (9x4x4)
Ingredients:
- water 240 ml, 110-115F
- honey 1 Tablespoon (21 g)
- active dry yeast 9 g (this time I used Bob's Red Mill)
- olive oil 2 Tablespoons (27g)
- salt 5 g
- whole wheat flour 125 g
- all-purpose flour 285 g
Directions:
- In a large food container dissolve yeast with water 220 ml and honey. Let it sit for 5 mins.
- Add salt, oil, and flour, mix with a wooden spoon to form a dough. Gradually add the remaining 20 ml of water.
- Knead the dough by hand on countertop until dough is smooth, soft, and elastic, about 15 mins.
- Slightly grease the container, put the dough in it. Spray with some water, gently cover it with lid. Put it into an oven which is preheated for 1 min. Let it rise for 1 hr.
- Scrap the dough out onto a floured surface. Punch down large bubbles. Gently knead for a few times. Cut into 2 pieces. Roll each dough out, flip and roll up gently. Cover with damp cloth and let it rest for 5 mins.
- Roll each dough out again, flip and roll up. Put it in pan, seam side down. Put in a warm oven to rise until 1 inch lower than the pan rim. Close the lid. (Don't spray water before 2nd rise. Water on the walls of pan cause sticking in my case.)
- Bake at 350F for 25 mins. Remove the lid and bake for 20 mins. Let it cool out of the pan on a rack before slicing or storing.
帶蓋吐司(12兩)(9x4x4吋)
材料:
- 溫水 240 ml, 約 40C
- 蜂蜜 1 大匙(21 克)
- 乾酵母粉 9 克(這次我用 Bob's Red Mill這牌子,它是需要冷藏的,酵母活性會保存得比較好)
- 橄欖油 2 大匙(27 克)
- 鹽 5 克
- 全麥麵粉 125 克
- 中筋麵粉 285 克
做法:
- 大保鮮盒中以溫水 220 ml溶解蜂蜜,加入酵母靜置 5分鐘。
- 加入鹽、橄欖油、麵粉,以木匙攪拌成團,逐漸分次加入剩下的水分 20 ml。
- 將麵團移到桌面上,雙手使勁搓揉翻折直到麵團光滑柔軟有彈性,大約 15分鐘。
- 保鮮盒內塗一點油,麵團放入噴些水,蓋上蓋子,放入微溫的烤箱(預熱一分鐘後關掉)發酵一小時。
- 將麵團刮出到撒了麵粉的桌面,輕壓排氣,輕輕翻揉幾下,分成兩等份。將麵團分別桿開,翻面後輕輕捲起,以微濕的布巾覆蓋,讓麵團休息 5分鐘。
- 將麵團再次桿開,翻面輕輕捲起,接縫朝下放入吐司模中,置於微溫的烤箱中發酵,直到幾近滿模,蓋上蓋子。(放入烤模發酵之前不要再噴水,烤模內壁有水會造成麵包粘黏)
- 以 350F/180C烘烤 25分鐘,蓋子拿掉再烤 20分鐘。出爐後脫模放涼再切片或裝袋保存。
 |
| After kneading. It looks slightly bigger than usual already. 揉麵完畢,此時麵團看起來已經比往常的大一點了。 |
 |
| After 1st rise. | 一次發酵完畢。 |
 |
| Before 2nd rise. | 二次發酵之前。 |
 |
| In just 25 mins! | 才 25分鐘就長這麼大! |
 |
| Let's do it again... | 二次發酵重新來 |
 |
| It's not the prettiest loaf but I'm satisfied. | 雖然不是挺漂亮的吐司,但已可稱滿意了。 |
 |
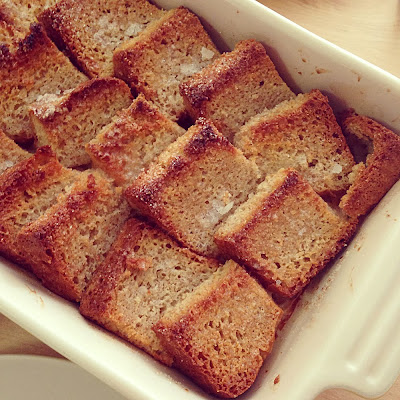
| The first loaf became baked french toast for a Saturday breakfast. 第一條失敗的吐司變成某個星期六早餐的烤法式吐司了。 |


沒有留言:
張貼留言